
| 일 | 월 | 화 | 수 | 목 | 금 | 토 |
|---|---|---|---|---|---|---|
| 1 | ||||||
| 2 | 3 | 4 | 5 | 6 | 7 | 8 |
| 9 | 10 | 11 | 12 | 13 | 14 | 15 |
| 16 | 17 | 18 | 19 | 20 | 21 | 22 |
| 23 | 24 | 25 | 26 | 27 | 28 | 29 |
| 30 |
- 스프링부트
- IOS
- 아이패드다이어리
- libasm
- springboot
- 다이어리
- jenkins
- javascript
- swift
- 리눅스
- 스프링
- CI
- 오블완
- 스프링부트 웹 소켓
- CD
- 인공지능
- 네트워크
- AI
- 42seoul
- DBMS
- sql
- 티스토리챌린지
- JPA
- Spring
- MySQL
- Xcode
- 데이터베이스
- 오라클
- 프로그래밍언어론
- 소켓
- Today
- Total
Hi yoahn 개발블로그
[Spring] #1 spring 시작하기 본문
1. 프로젝트 생성하기
- spring boot 기반으로 스프링 관련 프로젝트 만들어주는 사이트
Project
- Maven
- Gradle (요즘 많이 사용)
필요한 라이브러리 가져오고, 빌드하는 라이프사이클까지 관리해주는 툴
version
Snapshot, M1 버전은 아직 만들고있거나, 정식 출시 안된 버전
Artifact
- 빌드되면 나오는 결과물 이름
Dependencies
- 어떤 라이브러리를 가져와서 쓸 것인가
- Spring Web, Thymeleaf (Template engines)
다 선택 후 Generate, 다운 받은 파일 압축 풀어서 intellij에서 open으로 열기
2. 프로젝트 구조
> gradle
> src
> main
> java // 실제 패키지, 소스파일
> resource // java 파일 제외한 파일들(xml, html, 설정파일..)
> test // 테스트코드
> java
> 프로젝트 패키지
> build.gradle
- 버전설정, 라이브러리 연결
- repositories { mavenCentral() }
라이브러리들을 다운받을 레포지토리 지정
3. 서버 실행
src/main/java/hello/hellospring/HelloSpringApplication.java
에 들어있는 main 실행 후 localhost:8080 접속
@SpringBootApplication
public class HelloSpringApplication { // 앞으로 만들 프로젝트의 메인 클래스

	public static void main(String[] args) {
		SpringApplication.run(HelloSpringApplication.class, args);
	}

}
@SpringBootApplication
- 어노테이션으로 인해 스프링 부트의 자동 설정, 스프링 Bean 읽기 & 생성 모두 자동
- 이 위치부터 설정을 읽어감 -> 항상 프로젝트 최상단에 위치
SpringApplication.run -> 내장 웹서버(톰캣) 실행
4. 라이브러리
로그를 위한 라이브러리 : logback, slf4j (두가지 조합 많이 사용)
5. View 환경설정
- Spring Boot 가 제공하는 Welcome Page 기능
- “static/index.html” 을 올려두면 Welcome 페이지 기능을 제공
스프링이 웹 애플리케이션 개발과 관련된 전반의 생태계 제공 < https://spring.io
-> 매뉴얼 가서 검색하면서 필요한 기능 찾기
Spring Boot Features
Graceful shutdown is supported with all four embedded web servers (Jetty, Reactor Netty, Tomcat, and Undertow) and with both reactive and Servlet-based web applications. It occurs as part of closing the application context and is performed in the earliest
docs.spring.io
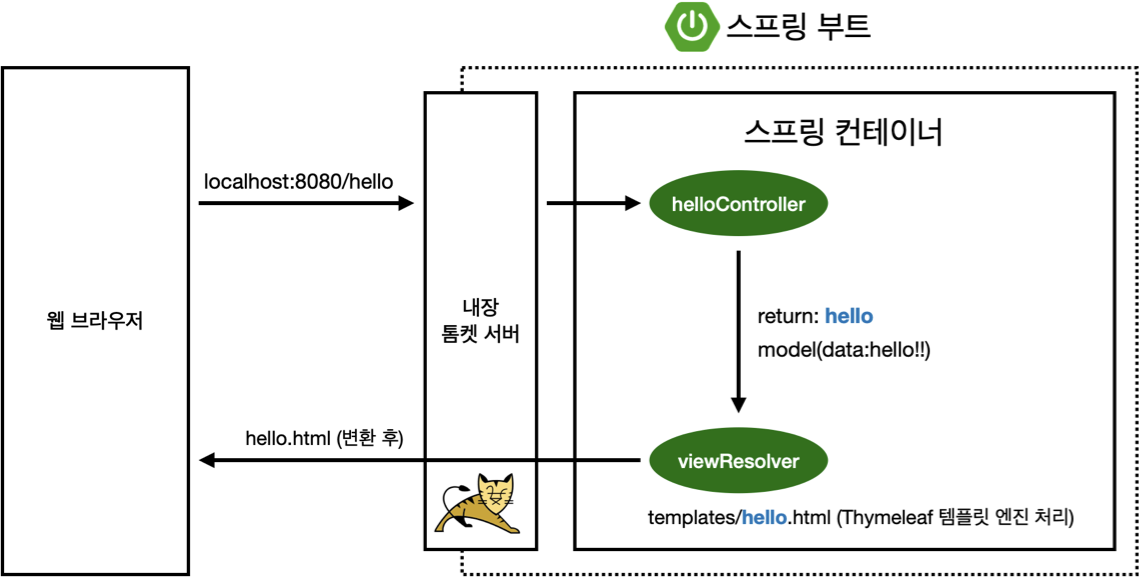
6. Controller
HelloController.java
@Controller
public class HelloController {

    @GetMapping("hello")
    public String hello(Model model) {
        model.addAttribute("data", "hello!!");
        return "hello";
    }
}- 웹페이지/hello 가 들어오면 위 메소드를 호출
- GetMapping -> Get 방식으로 url 매칭
- 스프링이 model 만들어서 넣어줌
- 뷰 리졸버 viewResolver: return hello -> resources/template/hello.html 찾아줌
- 스프링 부트 템플릿엔진 기본 viewName 매핑
- resources:templates/ + {ViewName} + .html
hello.html
<!DOCTYPE HTML>
<html xmlns:th="http://www.thymeleaf.org">
<head>
    <title>Hello</title>
    <meta http-equiv="Content-Type" content="text/html; charset=UTF-8" />
</head>
<body>
<p th:text="'안녕하세요. ' + ${data}" >안녕하세요. 손님</p>
</body>
</html>- 컨트롤러에서 추가한 속성: data="hello”
- p 태그의 data 부분을 컨트롤러에서 전달한 data 값으로 치환
7. 빌드하고 실행하기
콘솔 $ ./gradlew build 빌드 폴더 생성
$ cd build/libs $ java -jar [jar 실행파일] 서버 실행
오류나는 경우 $ ./gradlew clean build 빌드 폴더 제거
'Framework & Library > springboot' 카테고리의 다른 글
| [Spring] #3 회원관리 예제 - 백엔드 개발 (0) | 2021.01.21 |
|---|---|
| [Spring] #2 스프링 웹 개발 기초 (0) | 2021.01.20 |
| #4 [SpringBoot] 머스테치로 화면 구성하기 (0) | 2020.09.11 |
| #3 [Spring Boot] JPA로 데이터베이스 다루기 (0) | 2020.09.08 |
| #2 스프링부트 테스트코드 (0) | 2020.08.31 |


